Share USB Device
Contents
Use Samba and an ext3 formatted device.
Guide to mount an WDTV Live NFS Server share to a Windows 7 (Ultimate) client.
Preamble.
This guide is aimed at getting you up and running with your WDTV Live as an NFS server in clear steps. Emphasis is on minimum complexity, minimum configuration and zero network optimisation. Skip straight to the guide: [1]
- Original Forum Topic that this wiki page is based on: [2]
Once you have the client and server working together the fun with optimisation and security can begin. This is covered in the nfs.sf.net howto.
Is the Samba Server with an ext3 formatted device a better option?
Before attempting to use this guide to setup the wdlxtv as a File Server please note that the option with the fewest issues is to use Samba with an ext3 formatted device. This is statement is based on the sheer volume of issues with configuring NFS. Also the fact that an NTFS formatted device does not share well when accessed from Windows Explorer at present. So yes, for a lot of people Samba and ext3 will be a better option. But for the inquisitive why not try NFS.
Does this guide cover using the WDTV Live as an NFS client?
No. There are already a good set of guides to use the wdlxtv as an NFS client/CIFS interceptor but this guide has been written to illustrate how to use the wdlxtv as an NFS Server.
By default is Samba or NFS faster with this setup?
- Basic Speed test results [3]
Summary of result: To share an ext3 formatted drive with Samba running on the WDTV Live is not only an even easier option but, with default settings, it is also faster than the NFS option.
Can this configuration be used with GNU/Linux?
This guide was also tested with Ubuntu 10.04.1 LTS running under VirtualBox 3.2 (On the same Win64 system). This was as simple as putting the following line in the /etc/fstab
wdtvlive.local:/tmp/media/usb/USB2/524882c3-d9ba-4d66-b428-16b8e929c075/ /home/user/n nfs
Then sudo mount -a.
But why do this if the Samba/ext3 alternative is faster?
Just for fun and knowledge. And because with optimisation specific to the NFS Server, network and configuration NFS has been shown to produce some of the fastest results http://wiki.wdlxtv.com/Wifi_Performance. But to get there you have to start somewhere.
Prerequisite.
Things you will need are an external HDD or flash drive formatted in ext3. Not ext4, not FAT32 and not NTFS just ext3. Doing this is another subject and there are loads of guides to doing this. As I have a dual boot system with Ubuntu this was easy.
WDTVLIVE NFS Server Guide
Instructions
00. Attach ext3 formatted drive to wdlxtv. (Not FAT32, not NTFS, not ext4, just ext3).
00.1 Note: Guide does not work with WDTV G1 (Thanks for the feedback SmileyMan).
01. Firefox
02. http://wdtvlive
03. WDLXTV Config
04. Main > File Sharing: NFS > NFSD "Check"
05. NFSD_AUTO "Check"
06. NFSD_AUTO_DEFAULT
*(rw,async,no_subtree_check)
06.1 Save.
07. Reboot (Important).
08. Windows 7 Ultimate.
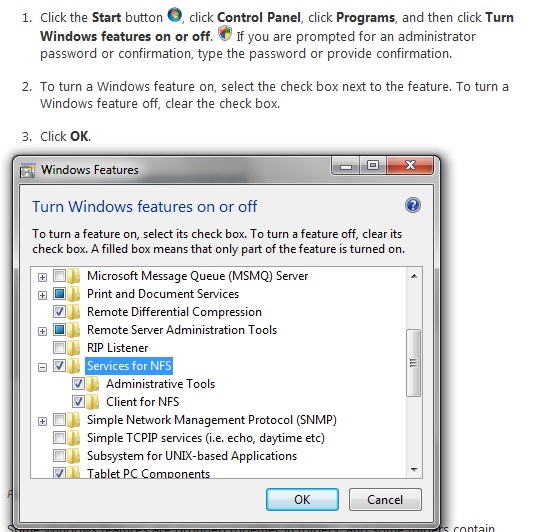
08.1 Click the Start button, click Control Panel, click Programs, and then click Turn Windows features on or off. Check "Services for NFS".
09. Or for other Windows versions http://www.google.co.uk/search?q=Windows+Services+for+UNIX
10. Install SFU35SEL_EN.exe 217.6MB
11. Reboot
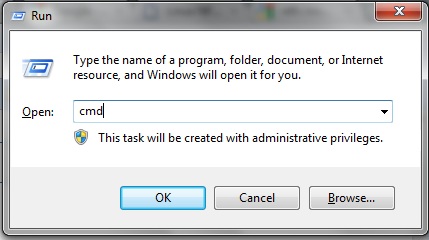
12.1 Windows Key r > cmd
showmount -e wdtvlive
/tmp/media/usb/USB2/524882c3-d9ba-4d66-b428-16b8e929c075 *
This confirms that the client, Windows Services for NFS, can see the share on the wdlxtv.
13. Windows Key r > Notepad
mount -o \\WDTVLIVE\tmp\media\usb\USB2\524882c3-d9ba-4d66-b428-16b8e929c075 n:
(Notice here the forward slashes / become back slashes \. You add \\WDTVLIVE to the start and remove the slash at the end of the line).
14. Windows Key r > cmd
15. Right Click > Paste:
mount -o \\WDTVLIVE\tmp\media\usb\USB2\524882c3-d9ba-4d66-b428-16b8e929c075 n:
(return key)
   C:\Users\user>mount -o \\WDTVLIVE\tmp\media\usb\USB2\524882c3-d9ba-4d66-b428-16b
   8e929c075 n:
   n: is now successfully connected to \\WDTVLIVE\tmp\media\usb\USB2\524882c3-d9ba-
   4d66-b428-16b8e929c075
   The command completed successfully.
16. Windows key r > n:
17. Transfer a file greater than 1GB and try and remember never to try this with a Samba share to an NTFS formatted drive (like I did a few times today before writing this).
That's it. You should now have an NFS share mounted from your WDTVLIVE to Windows 7 Ultimate. I did this over wifi but I hear good things about using network cables to get the best out of NFS.
17.1 Had enough and want it removed? Windows key r > cmd
umount n:
(Reboot Windows to complete changes).
If people think using a * wildcard is bad form then fair enough but I did not want to get into security and permissions to keep the guide sweet. Suggestions very welcome.
Reference
- Using wdtv live as the nfs server http://forum.wdlxtv.com/viewtopic.php?f=3&t=1417
- NFS vs SMB vs FTP vs SSH speed test results http://wdtvforum.com/main/index.php?topic=5393.0 The now infamous speed test.

